Welcome to The Gone West Shop
If you’re new to the Gone West Shop, this is the place to start. This collection of documents will walk you through all of the necessary first steps to selling on our website and understanding how to get started with the Gone West Shop.
Signing Up
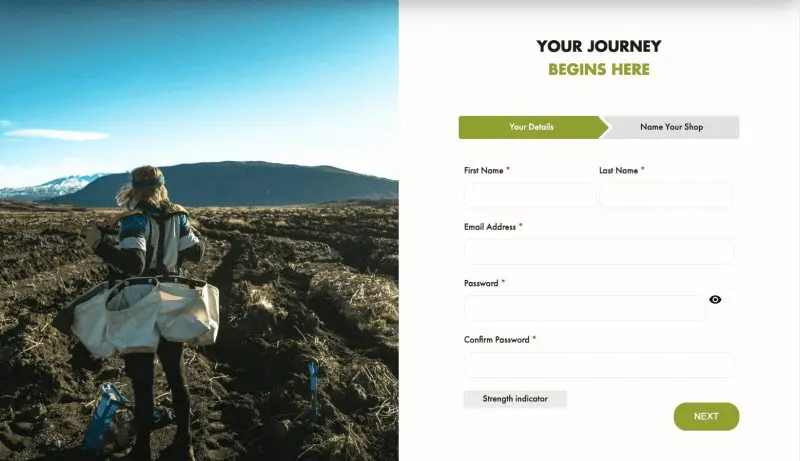
You can find the registration page on https://shop.gonewest.com/backup/begin/
Once you get to that page, fill in your details carefully so that you may go on to the next step.
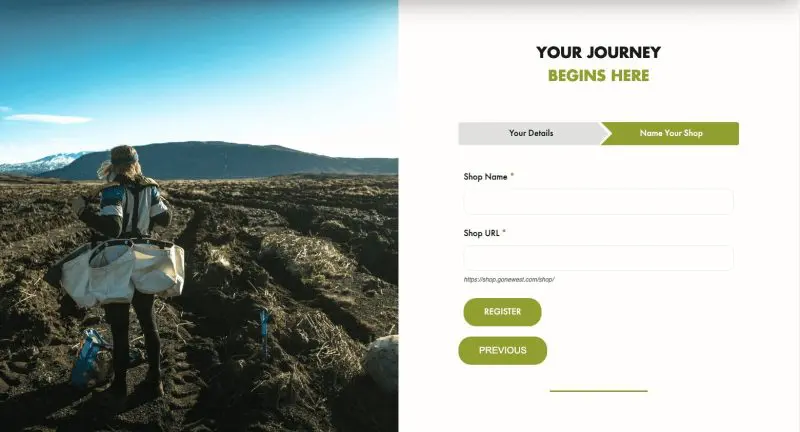
Now for something everyone enjoys. Your shop details, the Shop Name field is how shoppers will discover you and how you will appear on our site.
The Shop URL field will be used to link to your stores personal shop page.
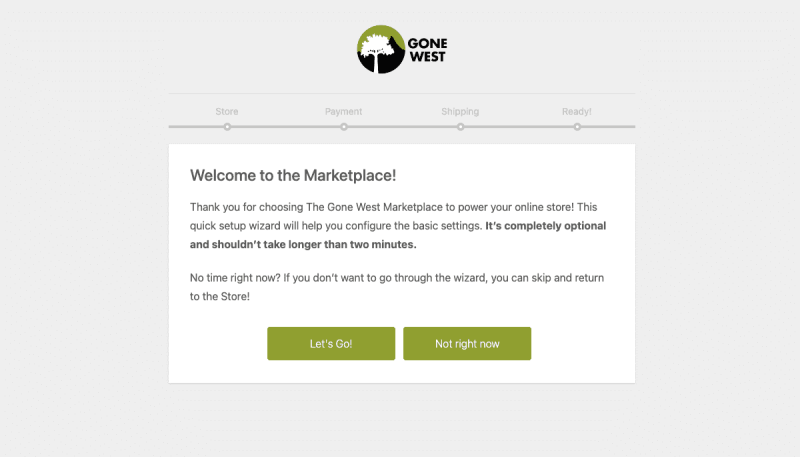
Your shop is officially registered with the Gone West Store. Congratulations and welcome! Now comes the more technical part. To proceed Click ‘Let’s Do This’!
Key Store Information
Here are three of the main sections of your shop, the storefront, payment information, and shipping terms. To get products live on your store, we need all these details filled in. Let us begin with the store.
Store
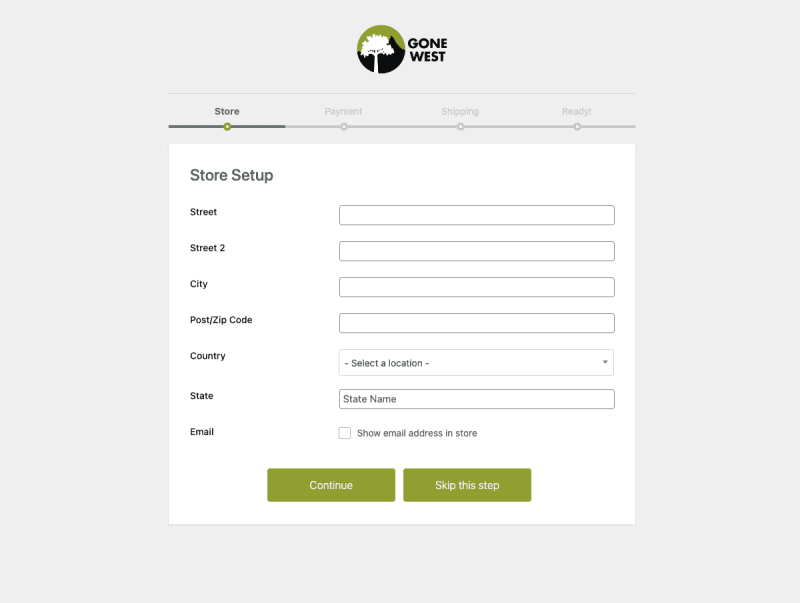
Here is were you will set your stores business information like address and there is an option to show you email address on the front of your stores page.
Payment
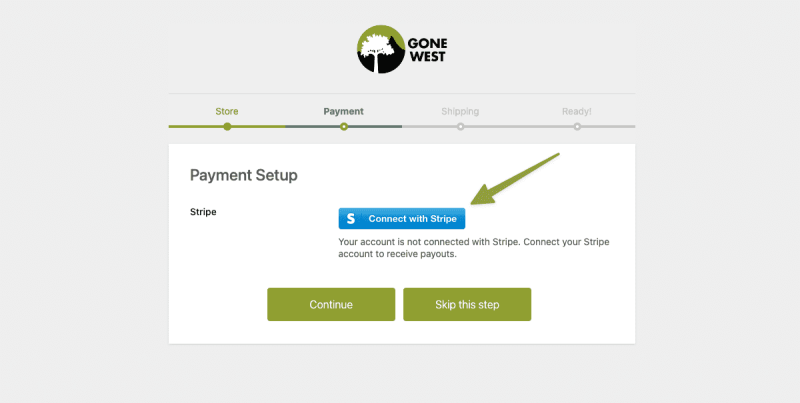
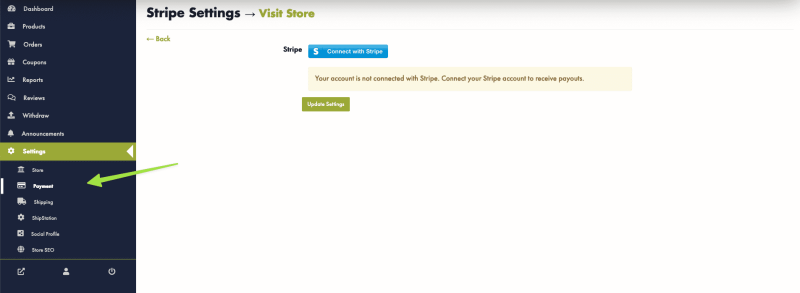
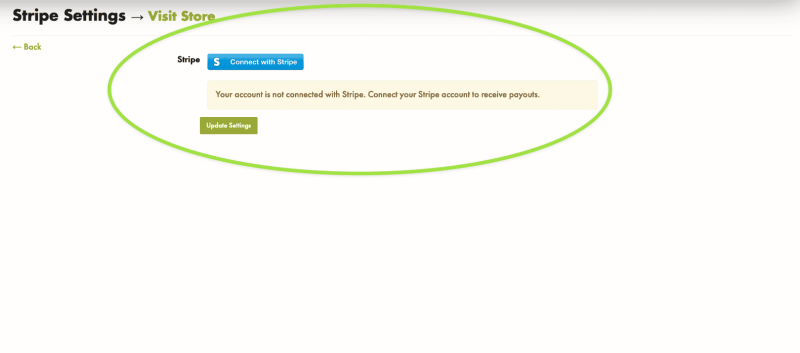
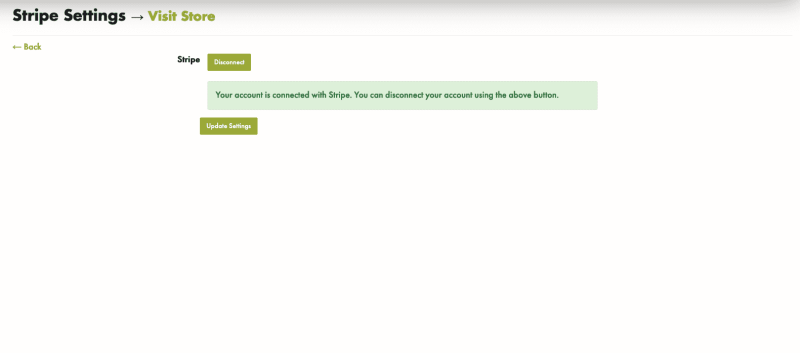
At the moment, to sell on the Gone West Store, vendors need to connect their Stripe accounts. If you do not have an account with Stripe, please follow the “Connect with Stripe” button and create one there.
As Gone West Marketplace is relatively new, we are still onboarding different methods to receive and accept payments in a safe and secure way. Soon we will be adding PayPal as a method of payout.
Click Continue when ready
Shipping
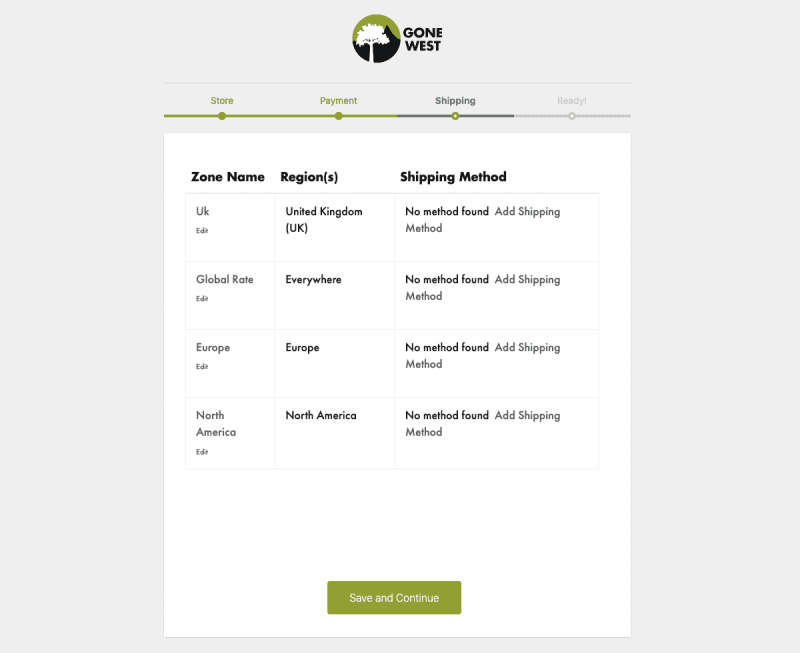
Please add your shipping methods; these will appear on the checkout page for your products. If shipping is not selected, products will not be able to be purchased by customers. Here is a 5-minute in-depth guide on setting up shipping. We recommend you do this as soon as possible.
Once Done Save and Continue
Vendor Dashboard
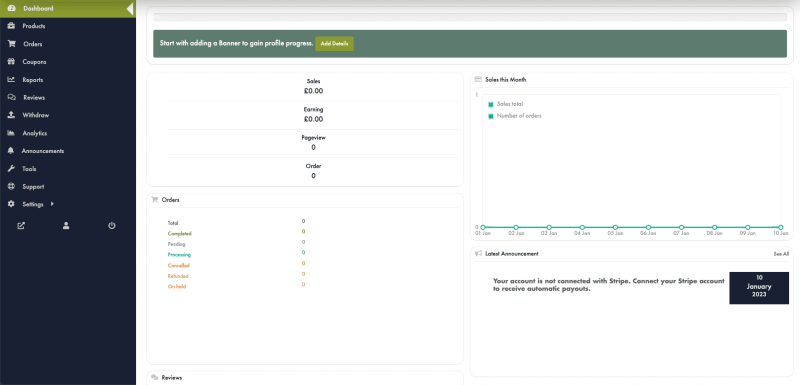
Welcome to the vendor Dashboard: You’re almost done; just a few more details to fill in. These are much easier than the previous ones. To speed things up, have a banner image, a profile image, and your social media links at the ready.
Progress Bar
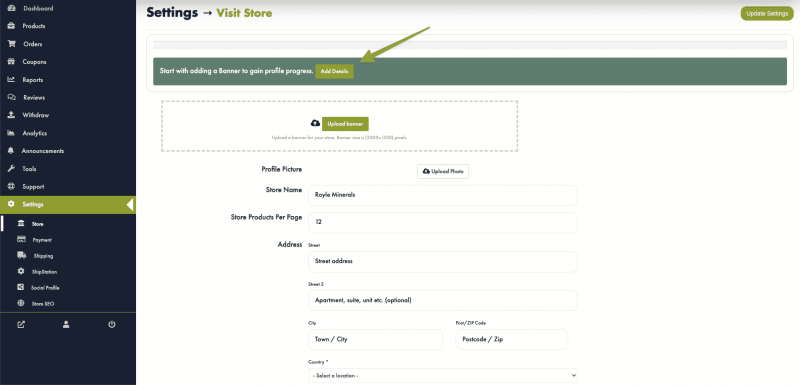
Here is our final step in the Gone West vendor sign-up process. Well done for making it this far. Here, we will be leaving you to follow the progress bar to complete your account. See the “Add Details” button that will take you to the section to fill in the required information.
When the progress bar is at 100%, products will be allowed to go live in the store. If there are pending products created before the progress bar is complete, they will go live once the progress is at 100%.
That’s all there is to it when it comes to signing up your store for the Gone West Marketplace.
Shipping
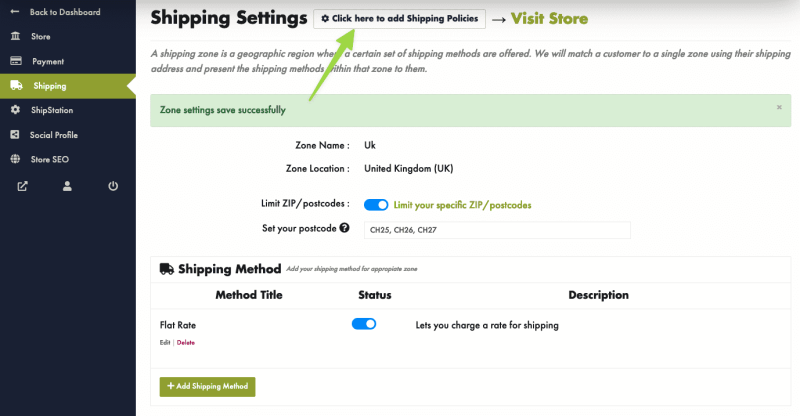
Vendors need to navigate to Store→Vendor Dashboard→Settings→Shipping.
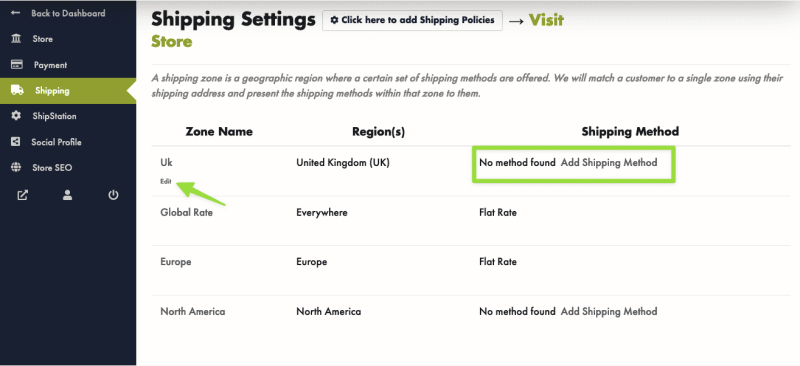
From here, a vendor can add shipping methods by clicking on Edit or Add Shipping Method.
The names of the zones tell you where the vendors can ship to. Each location can have its own Shipping Fee. If you don’t want to ship to a Zone, leave the shipping method blank.
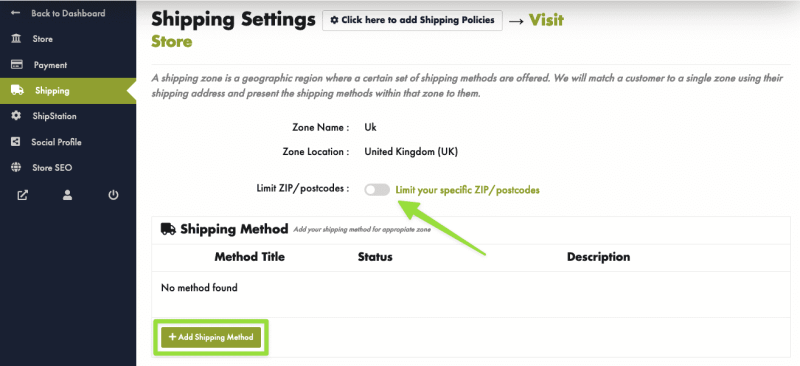
A new page will open.
From here vendors can choose to limit zone location for his customers and also add new shipping methods.
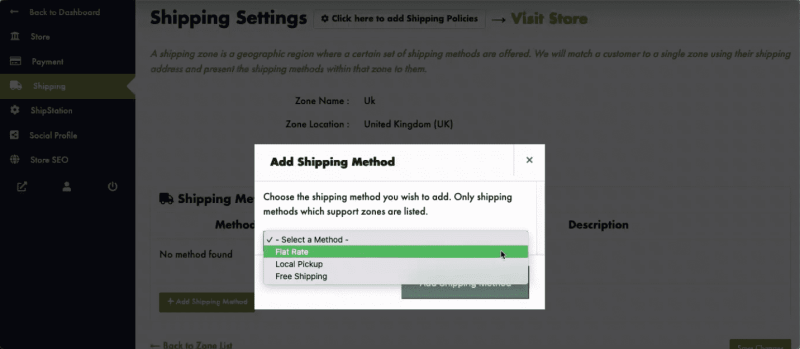
To add shipping methods, vendors need to click on Add Shipping Method and select one from the drop-down.
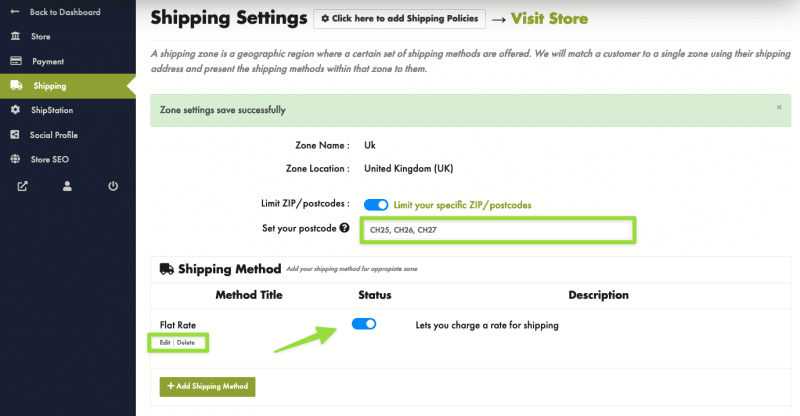
In this way, vendors can add unlimited shipping methods. By hovering over the shipping method, vendors can edit and delete. And the toggle button can be used to enable/disable a shipping method.
Vendors can also limit zone location using postcodes that apply to customers purchasing from that zone.
To set the store’s shipping policy and shipping processing time for the customers. Just simply click on the policy settings tab in the top right corner, as shown in the image below, to manage the shipping policy settings.
3a. Flat Rates
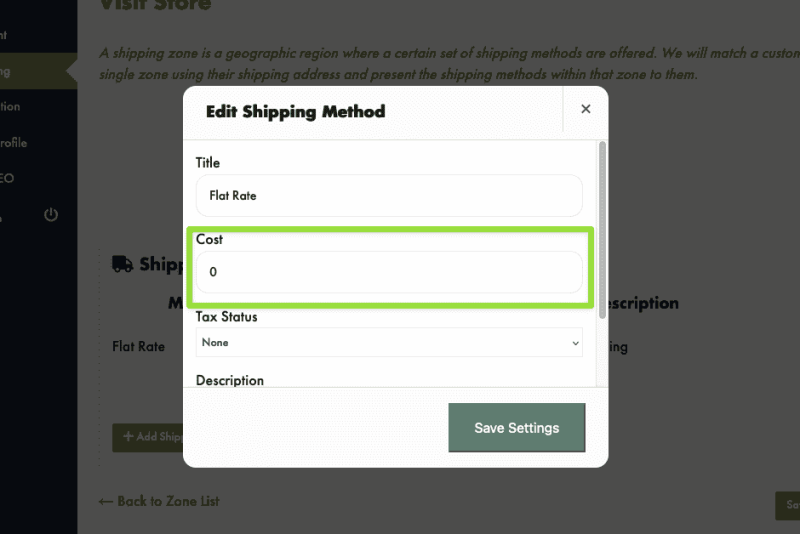
Each Shipping Zone can have different(and multiple) Flat Rates if you wish.
1. To make changes to a shipping method, vendor needs to click Edit.
2. Vendor can change the Title if he wants to or keep it as default. This title displays to customers in checkout.
3. Next they have to add the Cost (this is applied to the entire cart).
4. Select its Tax Status (define whether or not tax is applied to the shipping amount).
5. You can also type a Description for this method if you prefer.
6. Click on Save Settings.
3b. Local Pickup
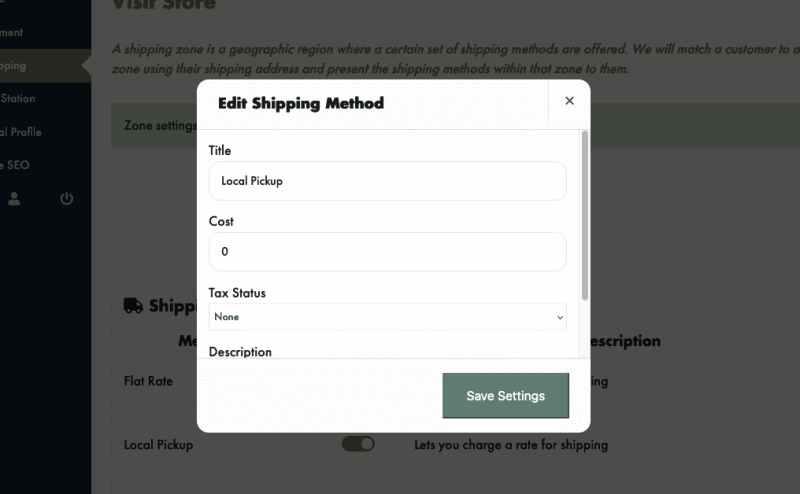
In Local Pickup, customers can pick up the order themselves from a designated location.
1. To make changes, hover over the shipping method and click on Edit.
2. Enter a Title that displays to customers in checkout – some shops change the title to Local Delivery, for example.
3. Enter Cost – Cost for the option, is applied to entire cart.
4. Select Tax Status. Then click on Save Changes.
3c. Free Shipping
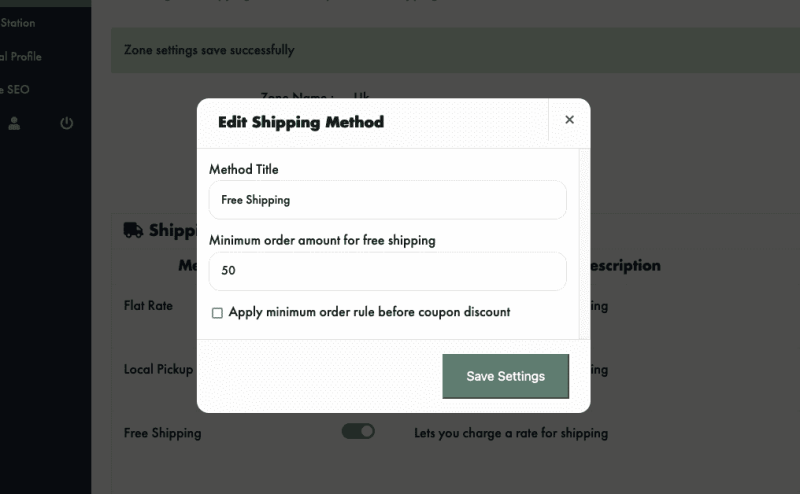
Free shipping is a great way to encourage customers to spend more. For example, offer free shipping on orders over £100.
1.Enter a Title that displays to customers in checkout.
2. Enter a Minimum Order Amount (if applicable).
3. Click on Save changes.
That’s all there is to it when it comes to configuring Your Store’s Shipping!
Product Upload
Create a product
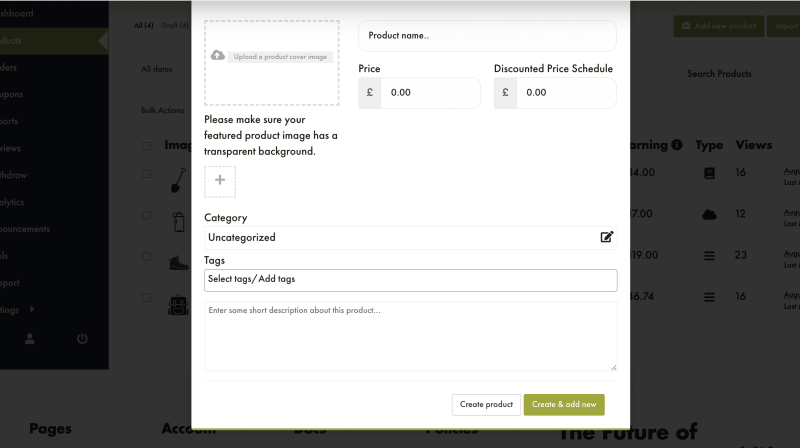
Go to Seller Dashboard → Product → Add New product
At the start, several fields are required, such as the product name, category, and price. Fill them up so you can continue on to the next section without interruption.
Now, click the “Create Product button” to be taken to the product edit page.
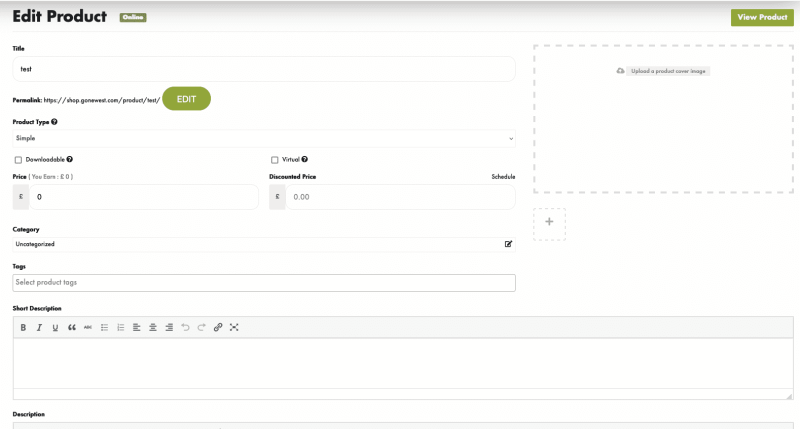
It is now time to put in additional important product details.
Title – The name of your product.
Permalink – is the link to your product.
Product type – leave simple for a single product or visit our guide to learn about variable products.
Price – The cost of your item.
Discount Price – The price at which your product is sold.
Select the category that best describes your product.
Please contact us if you do not see one.
Tags – Leave blank as these may be removed in newer versions of the marketplace.
Short Description – This will show alongside your product photos.
Description – use to add any additional information about your product.
Linked Products
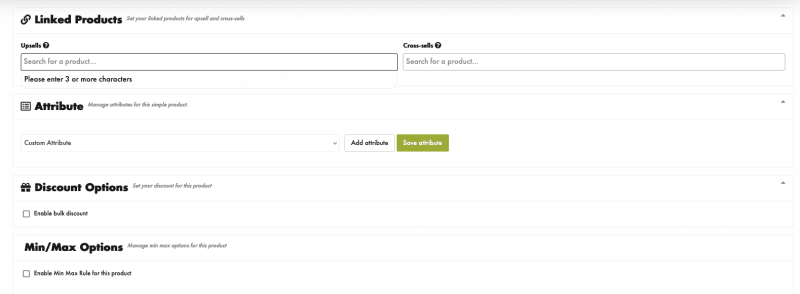
You can choose the products that up-sell and cross-sell with your product. Upselling is when you offer your customer a larger or better version of the product they’ve already purchased. Cross-selling is when you offer your customers items that complement a previous purchase.
Choosing these products here will help us show the products that best match your product on the product page.
Attributes
are linked to variable products. They are not require for simple type products. If you want to learn more, check out our guide on variable products.
Discounts
You can set minimum quantity discounts. When a customer orders a certain quantity of your product, they receive a discount.
Min/max options
Set minimum and maximum order quantities.
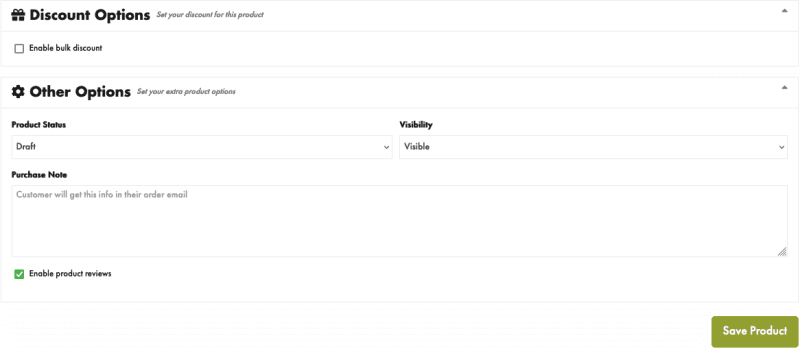
Product Status
When it is necessary to make changes to your product. You may flip between the Online and Draft statuses, allowing you to remove your product from the shop without deleting it.
Visibility
Choose a location where your goods may be visible.Visible is the best option for conversions.
Purchase notes
If you give any critical notes about your product in the Purchase Notes area, they will be emailed to your customer.

That concludes the process of creating your products. Thank you for taking the time to read the above. Please contact us if there is anything we can do for you.
How To Create A Variable Product
Create a product first
Go to Seller Dashboard → Product → Add New product
There are several mandatory fields at the start, like product name, category, price etc. Fill them up so that you can move on the later sections without interruption. Now, click on the Create Product button and it will redirect you to the product edit page.
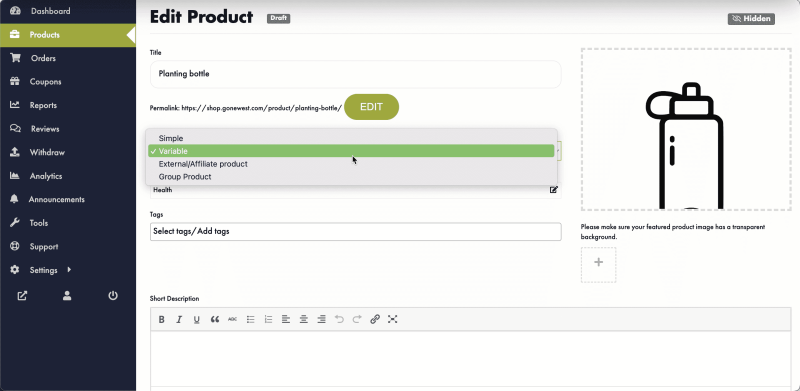
Choose the type of product you want to create at this stage. We’re making a variable product here. So, from the Product Type drop-down menu, choose Variable. Now, include product categories and tags so that your customers can easily locate your products in your store.
Enabling Variations
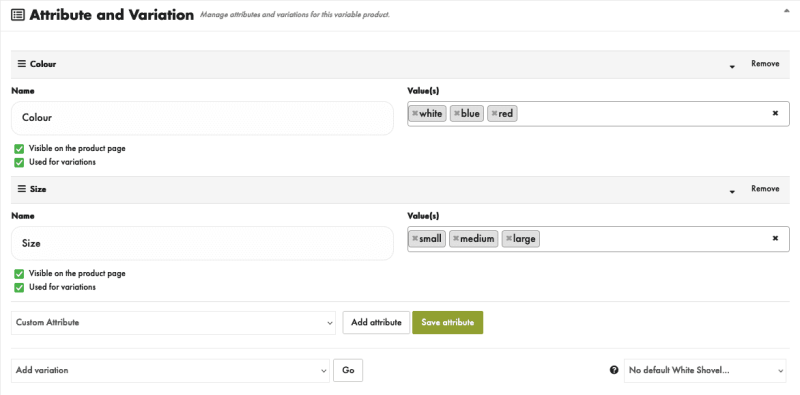
Now scroll down to the Attribute & Variation section from where you can manage different variations and attributes for your variable product.
Creating Attributes
You can create a new attribute by selecting Custom Attribute and click on the Add attribute button. Now, provide the attribute Name and their values. You can create more values by entering ‘|’ character after providing a value.
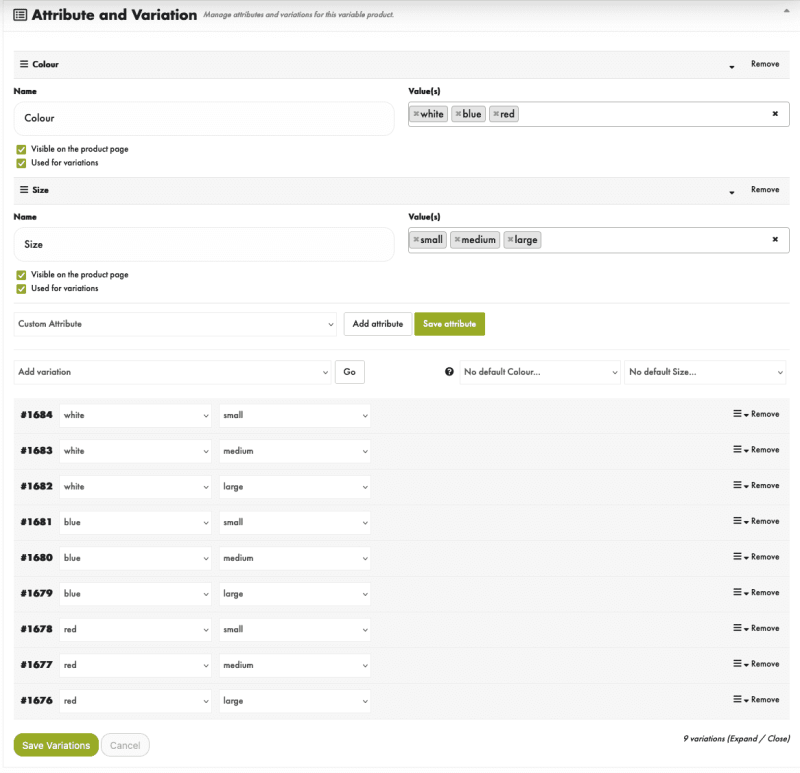
Now, to create new variations of your product from the provided value, select Create variations from all attributes. You can also create single variables according to your requirements by selecting Add variation option. After choosing your option, click on the Go button and it will generate possible variations from your attributes automatically.
Editing and Saving Variations
From the screenshot below, you can see that Gone West shop has generated all the possible variations for your product. Now, you can edit generated variations according to your requirements.
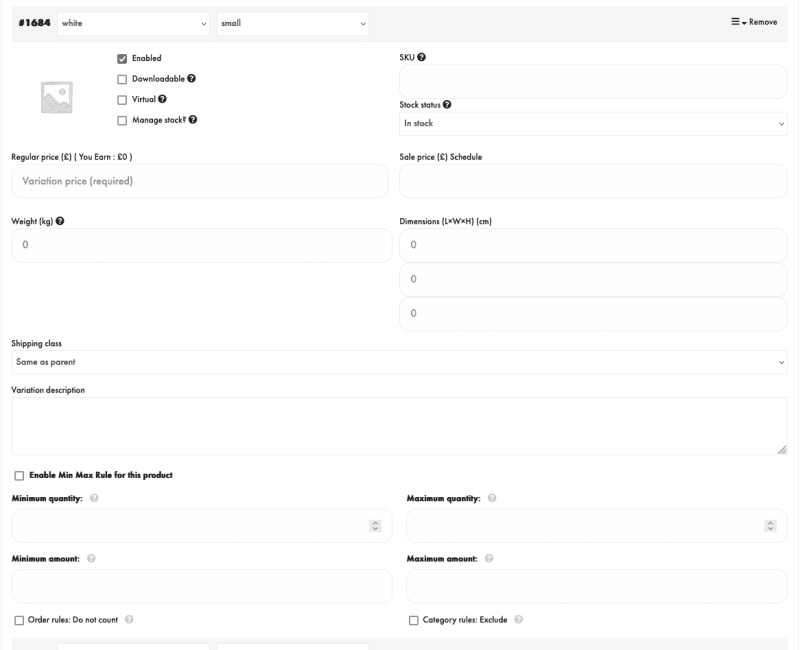
Now, click on the down arrow button of any of the variations that you want to edit. It will open description and SKU option for that variation.
Enter your variation’s price, dimensions, and SKU. You may also enter a variant description for this product version. You may also remove any versions for this product that you do not have. After you’ve finished adjusting the variables, click the Save Variations button to save the variant.
You may now include any discounts for your product. You can also specify other choices. Product status, visibility, purchase note, and product reviews are all choices. After you’ve finished all of the steps, click the Save Product button to finish creating your variable product with Gone West Shop.
Withdrawal
In the vendor dashboard, head to Settings > Payments.
Here you will find our current withdrawal methods. At the moment, we use Stripe to handle our payments and withdrawals. Soon we will add PayPal and, later, direct payment transfer.
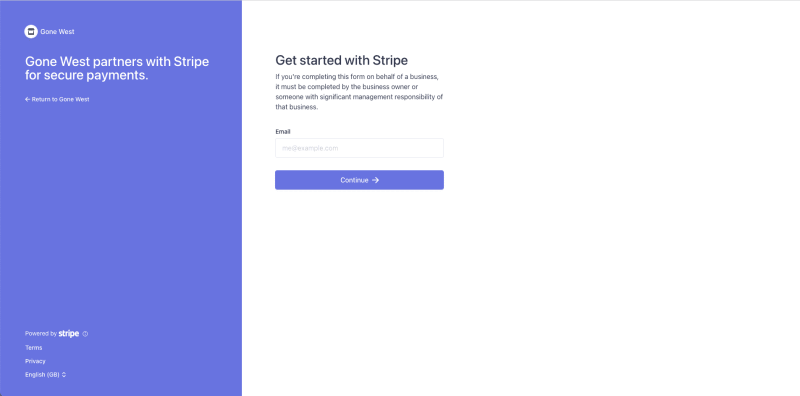
Select the “Connect with Stripe” button, and you will be directed to the official Stripe website to either create an account or connect an existing account to your store.
Please note that not all information is stored with Stripe; we do not see any account information or have access to your funds once you proceed.
When you get to the Stripe page, you will be presented with an email input box. This will determine whether you need to make an account with Stripe.
We feel having a Stripe account is an important part of running an online business today. When you have a Stripe account, you can use it to handle other online payments, like those from your own website or payments made directly to your Stripe account. We want to not only help save the planet, but we also want to support your online business journey.
When you have finished the step above, you will be redirected back to our website. With a successful completion message.
Withdrawal Balance and Schedule
After connecting your Stripe account, you can come to the Withdrawal tab, where you can see some important informationBalance is your available withdrawal balance.
Payment details: This is where you can see when your most recent payment was made and when you want to schedule a withdrawal.
Withdrawal schedule
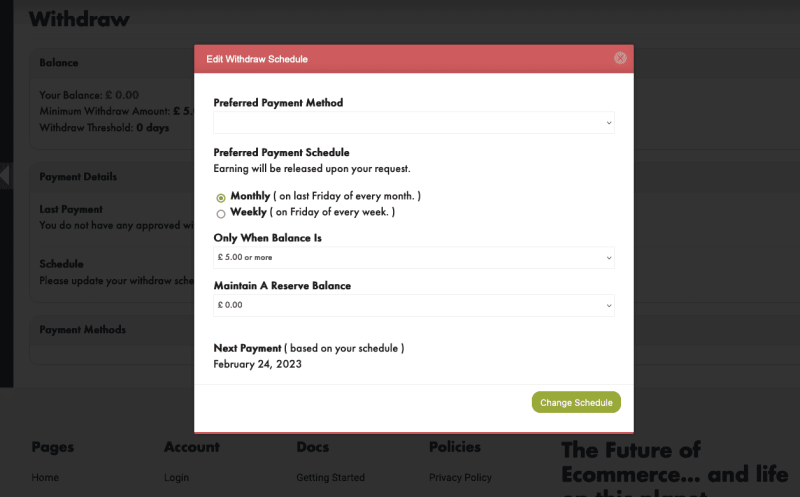
A pop-up will appear when you click the “Edit Schedule” button.
Here, you can select your preferred payment schedule. By default, it is set to be paid monthly every Friday, but this can change to once a week on a Friday.
Thank you for taking the time to read our withdrawal document. If you have any questions, please feel free to get in touch.
